
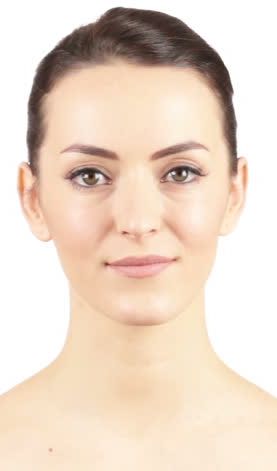
Lesson 3 – Sketch
Now I'm offering you to watch a video about drawings a sketch for the permanent makeup and how it looks in real practice.
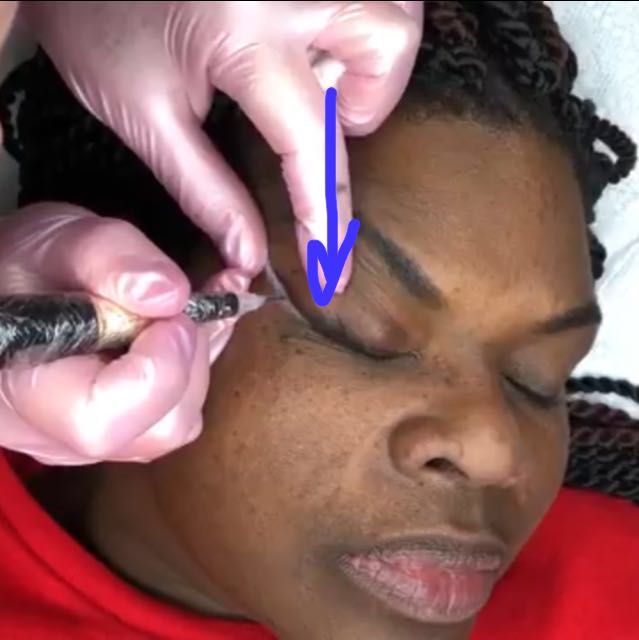
Drawing the sketch
Basics of sketch drawing plus rendering it depending on different types of eyes.
In this course, we will only discuss the basic aspects that are important for drawing a sketch for eye PMU.
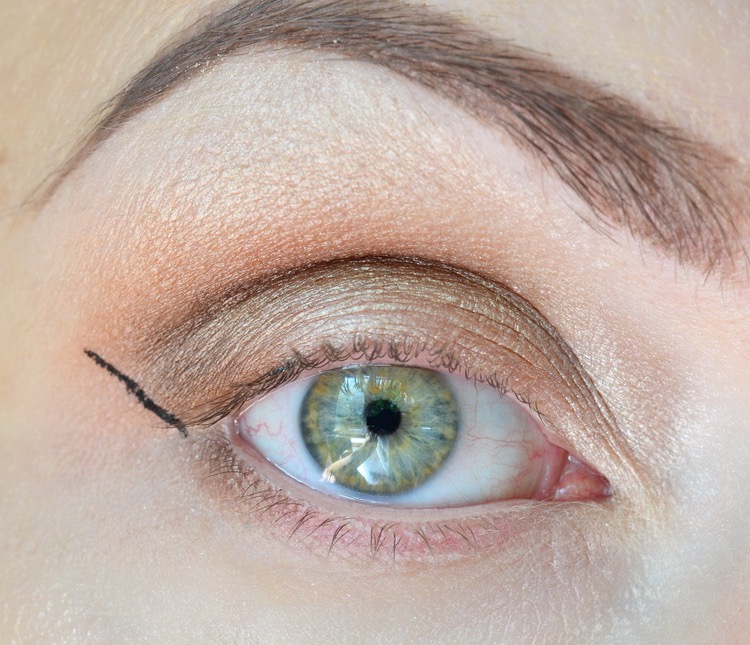
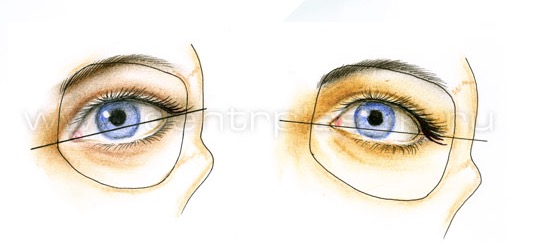
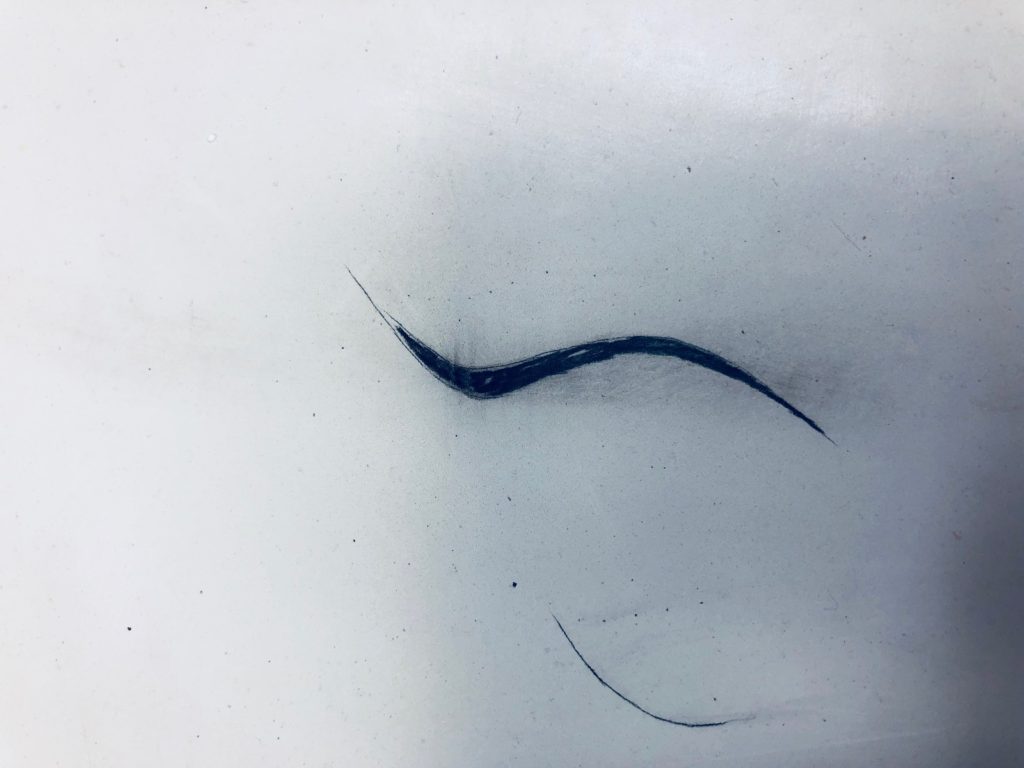
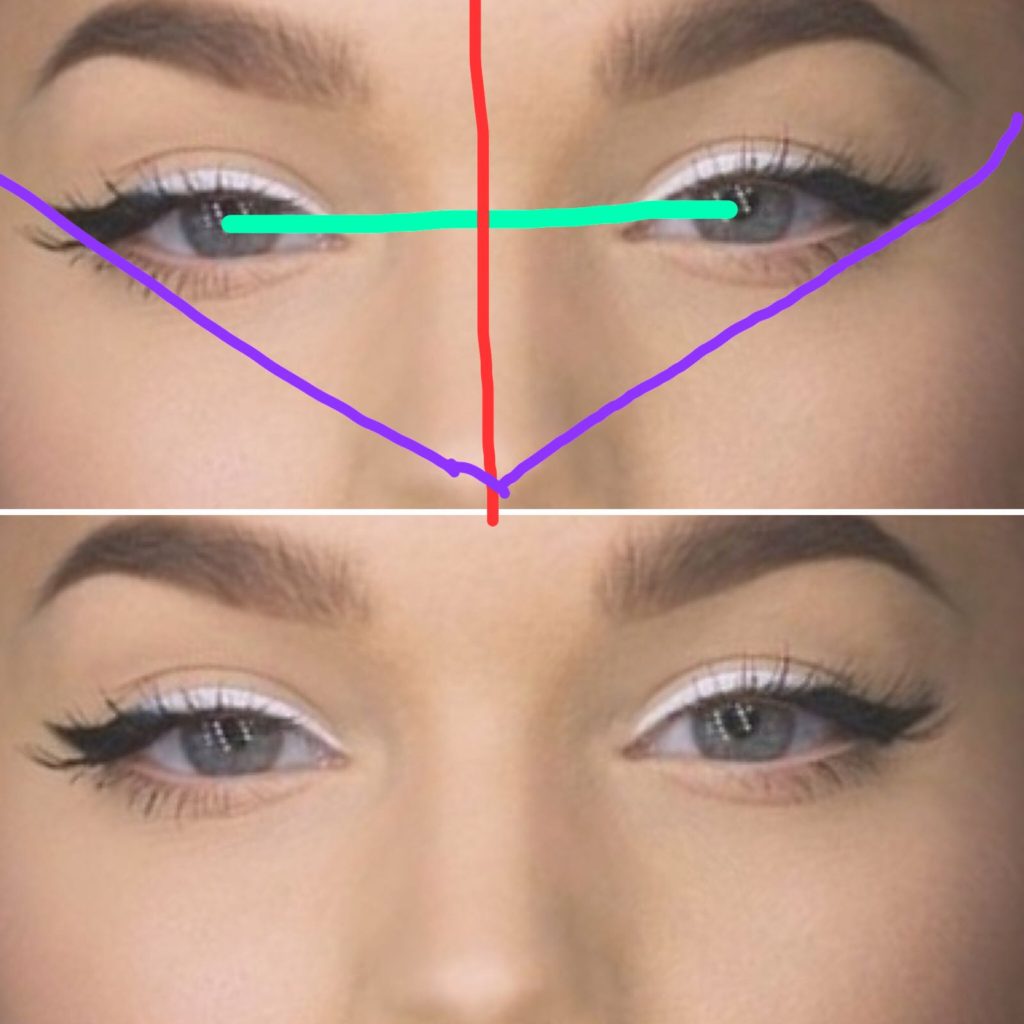
The most important line in eye makeup is the baseline, the edge of the sketch.
In order to properly create this line, it is necessary to remember the basic rules for constructing eyeliners.
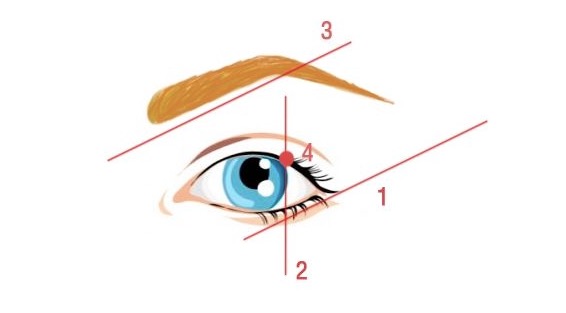
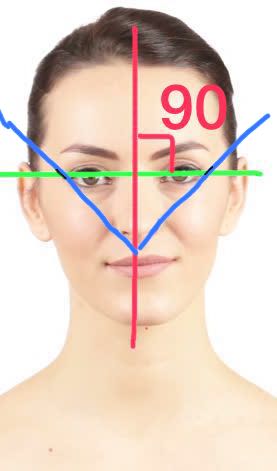
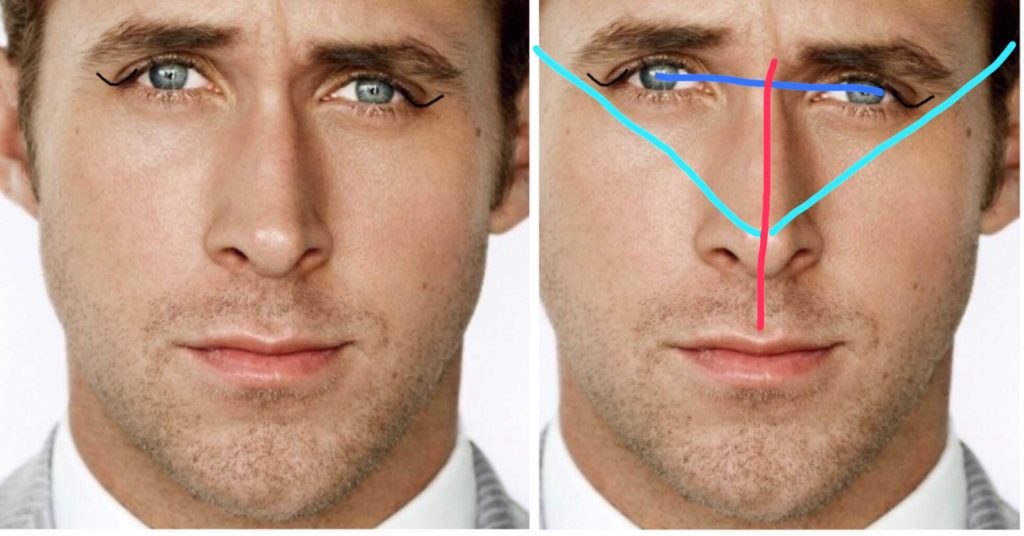
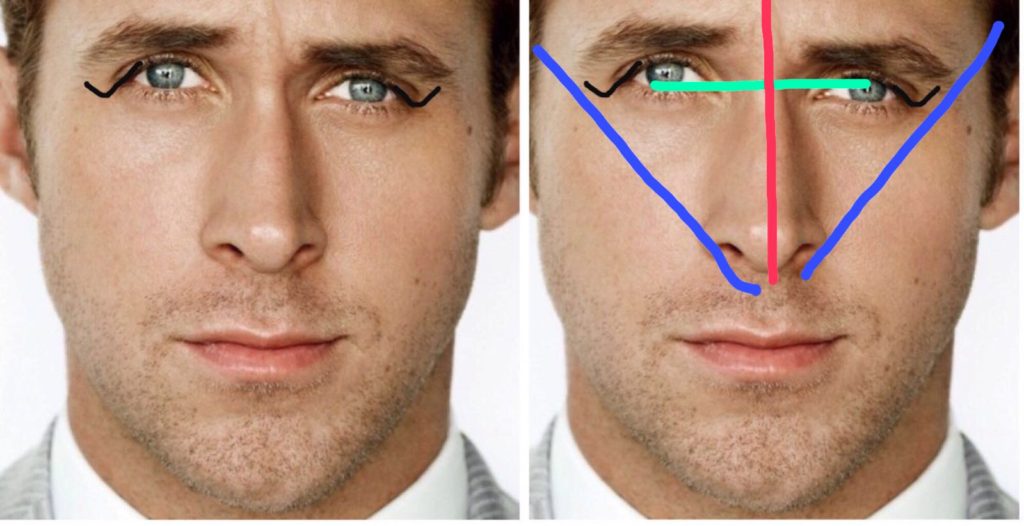
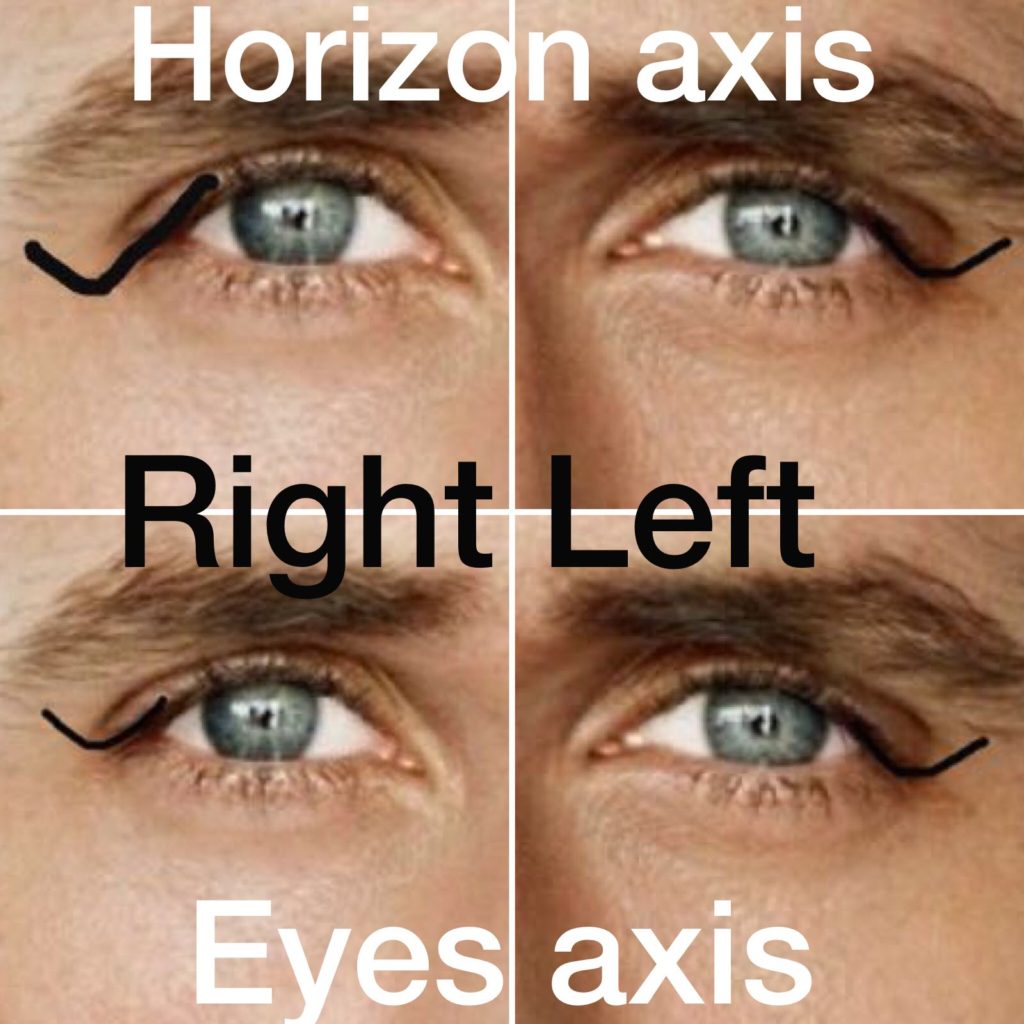
If you look at the axis, then the main point is line number 1, it is the continuation of the lower eyelid line and as a rule, it is the baseline of the eyeliner.
If you look at this line, then to construct it other lines can help as well. I will remind you that all lines of the face are practically parallel and their directions can be easily traced.
-Edge of the lower jaw
-The angle of the lower lip
-Cheekbone
-Lower eyelid at the outer edge
-The bottom line of an eyebrow from head to arch.

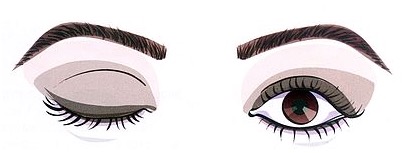
In this picture, the options are shown where the baseline line coincides with the yellow red and blue color of the marginal area that limits the zone of the necessary shading and gives direction and the length of the outer edge.
As you can see, all these options are almost parallel.
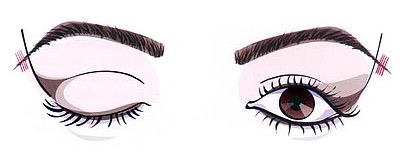
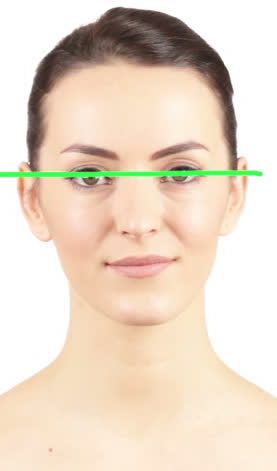
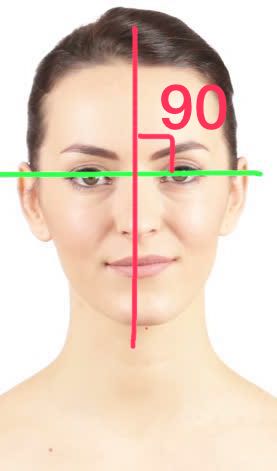
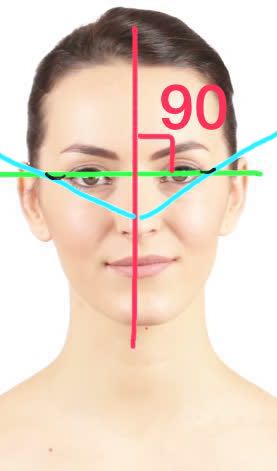
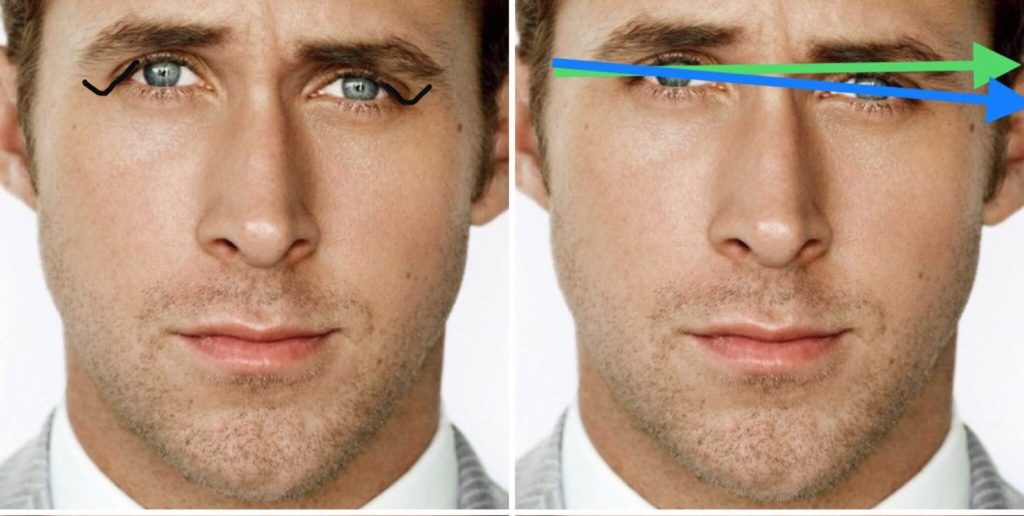
And it seems possible to continue indefinitely, but we are limited by the axis of the eye-the line drawn from the inner corner of the eye to the outer corner It is the second most important line in the drawing of the eye makeup sketch of the eyeliner or eyeshadows.
So, there are three options:
-Ascending axis
-Horizontal axis
-Omitted axis
Since the eyeliner creates new contours of the eye, it changes the axis. The ascending axes create the lifting effect and make the face look younger. The downward axes make the face heavier and with such a make-up the woman looks older and dull.
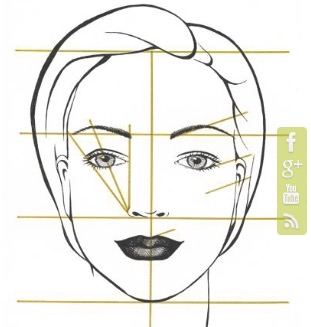
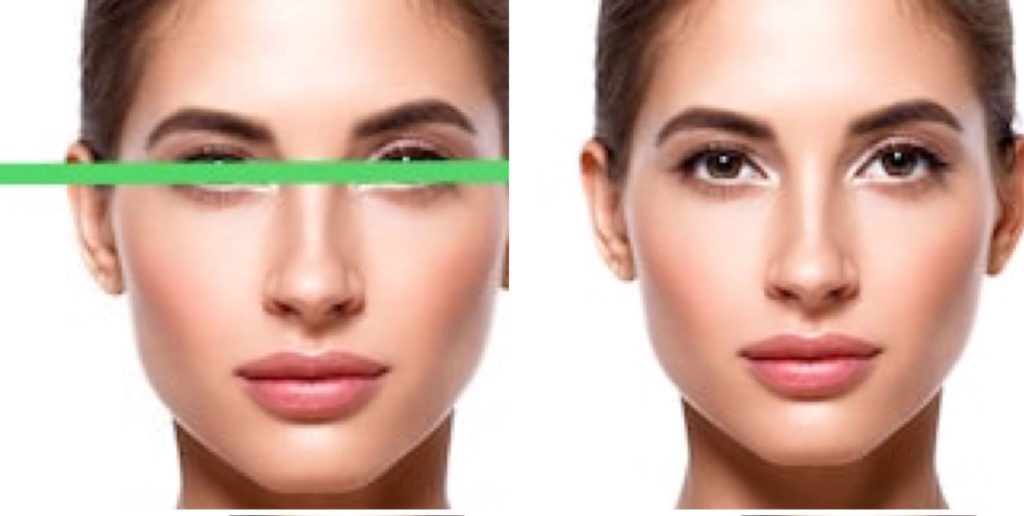
Paying attention to the horizontal axis of the face passing through the inner corners of the eyes, we draw the arrow the way the client wants as long as the sketch is located in the zone of the ascending or horizontal axis as shown in the picture.
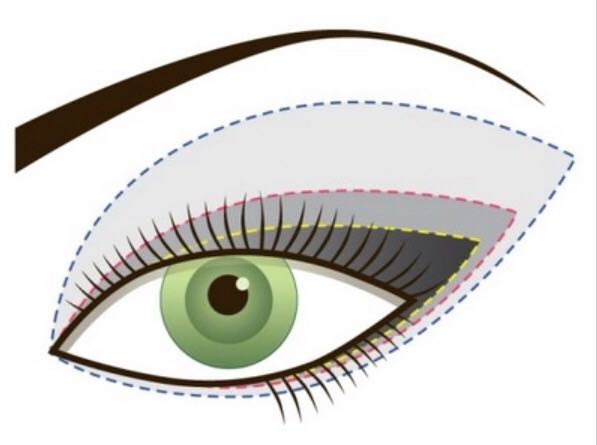
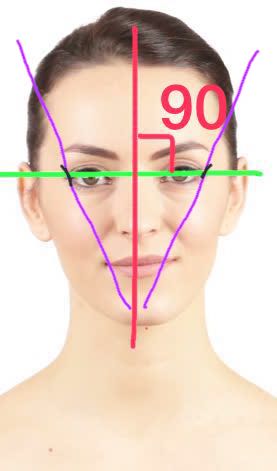
So let's analyze the most popular cases of correcting the shapes of the eyes with Eyeshadows.
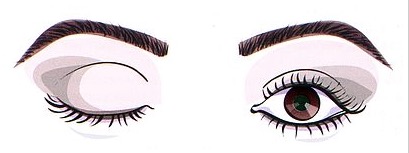
The classical set of the eyes and the horizontal axis of the eye, the application of eyeshadows is possible within the shown boundaries.
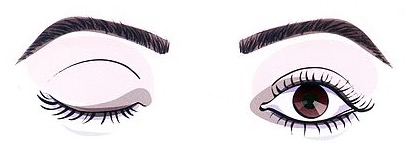
Clients with Widespread eyes are not the best candidates for applying the classical version of eyeshadows style in PMU. such a make-up with darkening of the outer corner will visually widen up the eyes even more, in this case, it is better not to use this technique, and it is better to use another style to accent the inner corner of the eye.
Clients with close-fitting eyes are ideal candidates for this technique, make an accent on the outer corner of the eyes. You should be not afraid to make the brightest accent on the corners.
The overhanging upper eyelid can be visually corrected only by creating a very bright and high-lifted makeup. To see the visible effect, it is necessary to raise the make-up much higher beyond the mobile age so that, with the eyes open we have a lifting effect. This work is very complicated, the volume of work is usually two to three times higher.
I also want to note that such clients can have a very efficient result if have blepharoplasty done. It is worth learning about the intention of the client in this case. It is probably better to consult a plastic surgeon first because PMU does not solve the problem efficiently.
It is always better to first have a plastic operation done and then decorate the eyelid with permanent make-up.
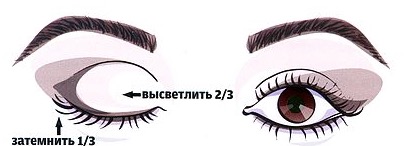
The omitted external corners of the eyes can be very well correlated with eyeshadows and perhaps this is the only truly effective way to make the face look more positive and open.
This option has only one disadvantage -the correction is visually visible only when you create a bright decorative makeup effect and draw clear lines and at the same time. Not every girl agrees to wear such an evening looking makeup in daily life. All these nuances must be discussed in advance and if the client does not like such an option it is better not to perform any PMU at all because any additional eyeshadow will only emphasize the already omitted corner of the eye.
I remind you that to draw a sketch you need to pay attention to the individual characteristics of the client's style, lifestyle, physiological and anatomical features, features of a face, coloristic type and natural contrast of a person's appearance.
Continue to talk about eyelids PMU. We already talked about some allergic reactions before. It is possible in the case of eyelids PMU. The allergic reaction can appear on anything as an individual reaction of the exact immune system. But most likely it can be on anesthetic cream. This is why some masters try to get rid of anesthesia at all.
But what to do to avoid allergic reactions? Just to ask about allergy on components of anesthetic creams or to do double tests. Why double I told before.
Here about allergic reactions
If to speak about issues of eyelids PMU we should mention migration of pigment in vessels. We already talked about it. What to do to avoid it you just can make some forecast for the possibility of such migration. As I notice there is possible when you see couperose (bright wide and visible capillaries) when the skin is dry and transparent, when you see weak turgor skin of eyelids (these are often old ladies), you can suppose to have migration of carbon black. If you see all signs of that you will have issues just work with dark brown and warm dark ash PMU colors.
Then, the most often issue is corneal burn.
In continuation of talk about aftercare corneal burn and allergic reactions, you just need to know that some clients have noticeable edema of eyes after eyelash enhancement procedure, but some clients have a normal state if even you made full eyelids filling with colorful shadows. It deepens on many factors, kidneys work, lymphatic system work, immunity, vessels state and so on. If there is no big issues with health this edema will completely go away in 3 days.
But what issues you can have more if something goes wrong?
What else if not an allergy or corneal burns:
Why did I write that we should work with just healthy people?
Sometimes your client can call you and say that something is wrong. She has red eyes, they are painful and so on. You can think that you made a mistake with an anesthetic cream and it penetrates into the eye, or you get some allergic reaction. But in reality, it can be herpes eye infection if the client was sick but didn’t let you know. It happens because she or he has weak immunity. And as well as affecting the skin of lips, herpes viruses can also infect the eyes, causing inflammation, redness, pain and light sensitivity.
How does herpetic eye disease develop?
Like many viruses, the herpes simplex and varicella-zoster viruses are present in most adults. The viruses in the herpes family usually live around the nerve fibers in humans without ever causing a problem. Occasionally, the viruses will start to multiply, or they will move from one area of the body to another, and that is when herpetic disease breaks out. This often happens when the immune system of the body is weakened by another health problem.
How is herpetic eye disease diagnosed?
The two types of herpetic eye disease have different symptoms. One thing they have in common, however, is that they can both be very painful because they affect the nerves directly. The problem is likely to be herpes zoster ophthalmic us if your eye doctor finds some or all of these symptoms:
- Pain in and around only one eye
- Redness, rash, or sores on the eyelids and around the eyes, especially on the forehead. Sometimes the rash breaks out on the tip of the nose.
- Redness of the eye
- Swelling and cloudiness of the cornea
- The problem is likely to be herpes simplex keratitis if your doctor sees these symptoms:
- Feeling of dirt or "grit" in the eye
- Overflowing tears
- Pain when looking at the bright light
- Swelling or cloudiness of the cornea
Now you see that you could not be able to diagnose your client yourself. This is why you should always direct your client to the doctor if something unpleasant happened.
As you see an allergic reaction, corneal burn and herpes can look absolutely alike. You can guess that if your client opened eyes during PMU procedure and complained about pain in the eye and you washed the eye you can be almost sure that next complains can be exactly about a corneal burn. But if you had no complications during PMU procedure and you cave complaining client better to send her or him to a doctor.
Enough bogeyman stories :)))))
- Now we will talk about different aspects of procedures and most often questions: how many passes do we usually do to make the procedure, how long does it take to do the full procedure.
☝How many passes do you need to make to-do eyeliner, how to know that it is enough: Of course for those masters who work a long time, it is not the secret that the term pass is a very relative thing. To tell the truth, I don't count passes, but I advise my students to count them to know how intensive the color is in the exact area if I see that they struggle to estimate the result visually. Usually, the area between lashes and area of graphic dense eyeliner should be done such a way you not to see any transparent places. But on the place of shadows pigment should disappear smoothly. What really can help you to do the estimation of the intensity of the color is examination of PMU area with a red laser pointer. You can see it on Softap technique video. Using this you'll see all gaps and defects in color. When you have found out that you made the solid color on dense areas and smoothly melting gradient on shadows areas that's it. You can stop working. You can use this light for brows PMU also but it will not help you with lips because the red pigment is not contrasting for being detected with the red light.
How long should an eyeliner procedure takes:
It is a very popular question in our courses. Actually it depends on the quality of the skin and chosen technique. I have 3 hours time slot for any procedure. It means 3 hours between clients. So during this time I talk to a person, make a photo, make a sketch, put anesthetic, prepare the workplace, mix pigment, make the procedure, talk to a client, tell about aftercare, calm down a little bit, choose time for touch up. So I guess work with eyes takes 1.5-2 hours. But I am a perfectionist, I know that some masters can do it faster. At the same, my students can spend 3 hours just making a shadow on one eye. And it’s ok because shadows is a complex technique for beginners.
Anyway, it is a very important topic of how to stay in schedule and what schedule looks like.
I teach my students to look after time. Define your own time slot according to your usual time of work. Always notice when you start and finish every step of the procedure.
- First talk to a person,
- Taking of photos,
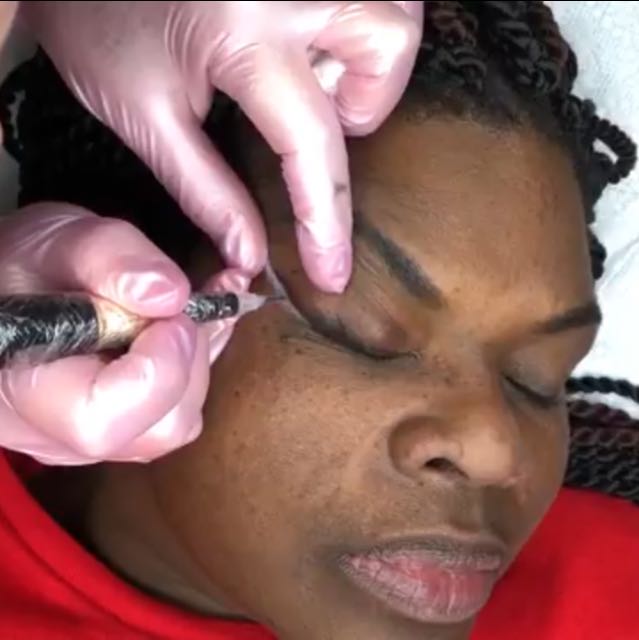
- Making of a sketch,
- Putting anesthetic,
- Preparing the workplace,
- Mixing of pigments,
- Making procedure,
- Talking and calming client down about swelling after procedure and results after healing,
- Talking about aftercare,
- Choosing the time for a touch-up
Make your own statistics and correct your time slot for one procedure if you see that you are always not in the schedule.
When you are not satisfied with your personal time of work, please look at what step takes too much time in your opinion and try to optimize it.
If you see that exactly tattooing takes too much time trying to observe it where you lose too much time and why. For example making the contour of eyeliner, making eyelash enhancement, making shadows, making shadows equal and so on.
Usually, the problem is in fast work in the basic pass and in the darkest areas. Remember where you should make the intensive color you should be very systematic slow and careful. No hurry, no jumping, no dusting there, there is one rule for dene areas “the slower the faster”.
Just be careful about light and transparent areas. There are opposite lows there: lighter, faster, jumping, dusting, “better more light layers than more regrets”.
Time management will help you to make work easier and calmer, in addition, you can increase your personal income, just recording the time of your work and optimizing the main steps.
Time management will help you to make work easier and calmer, in addition, you can increase your personal income, just recording the time of your work and optimizing the main steps.
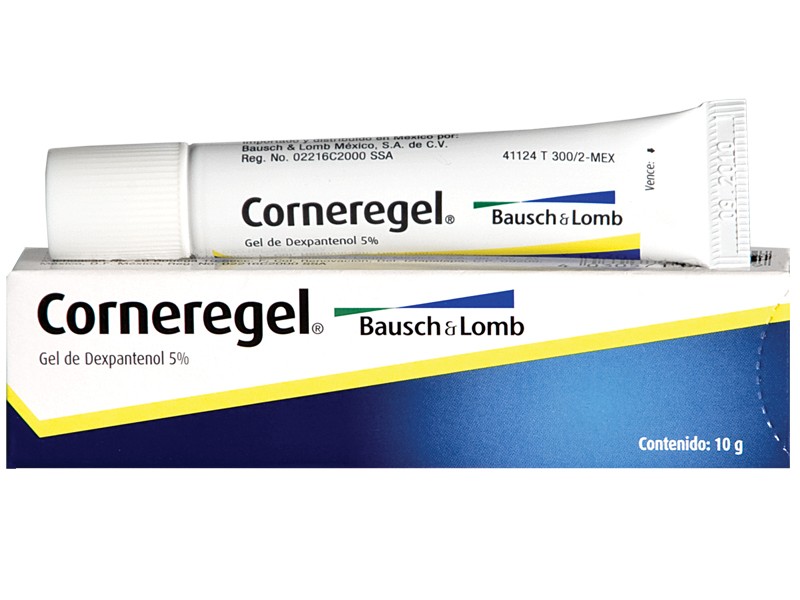
This solution is based on a substance the main function of which is the rapid restoration of the cornea of the eye due to the consolidation of its regenerative properties and at the expense of the gel structure. this gels works as an eye-shield from excessive ingression of numbing solution into the eyes and removing unpleasant sensations.
An example of applying a gel is in the video below.
Next, we apply the numbing cream, There are different methods of anesthesia -primary and secondary types.
I prefer an eye anesthetic cream as a primary solution, it is left for 20 minutes on an undamaged surface. Then I apply blue eyes gel as a secondary anesthetic already on the damaged skin during the procedure.
Ok, now let's watch a procedure video
- THICK LASHES EFFECT
Ok, now here is exercises for you.
1. HALF CIRCLE
The next exercise is aimed at getting the dense color. We need it to work over the liner and to create the eyelash enhancement line. This is the basic old school movement. The base of successful performance in technique is:
- Short, often repeated movements ( a large number of repetitions per unit area of the skin)
- Getting the maximum dense color after 1 pass is exactly what ensures the speed and efficiency of the work. The procedure is painful enough and it is better to finish it as quickly as possible.
- Superficial implantation of pigment into the skin, I remind you that on a surface the color looks more 3D like and if we implant the pigment deep into the skin the color will look flat and blue.
- Usage of warmest shades of dark colors balances the coldness of pigment at least a little after healing.
- The use of a 3 RL needle gives the dense and fast implantation of pigment, great retention, and a dense color as a result. But you can also use 1 acupuncture needle on a good type of skin. It has also proved itself well, however, you have to be very careful working on the thin skin, in this case, 5 or 7 RS needles will give a good surface color and they are easier to control the depth we work with. But it is more difficult to guarantee good retention, after the healing a lot of color goes away.
- Movements in this technique can be different, circular, zigzag, short semioval, the pendulum in one or both sides (we'll talk about it). I prefer short ''pendulum'' movements in one direction to myself as shown in a video.
- And as the skin of eyelids is very thin then it is much more efficient and easier to work at an angle of 45-60 degrees, sometimes even more but only with 1RL and 3RL needles. Using other needles with a larger number of pins it is better to keep the angle of 90 degrees.
- I use shaders in the middle of the eyeliner not reaching the very edge of the sketch, to make the edges of the arrows clearer you can use the 1 RL needle.
- Aligning the eyeliner
So, the homework is to draw the arrow at first with a contour motion, just above the sketch, then filling the space in there with the 3RL needle with an angle of 45 degrees in one pass, then even out and perfect the line with the 1RL needle.
The final result of your homework should look like this
after 1 pass I want to see dense color it can be uneven a little, but I want to see real results after 1 pass only
And also little bonus about how to fix sharptail 😘
- Now let’s continue
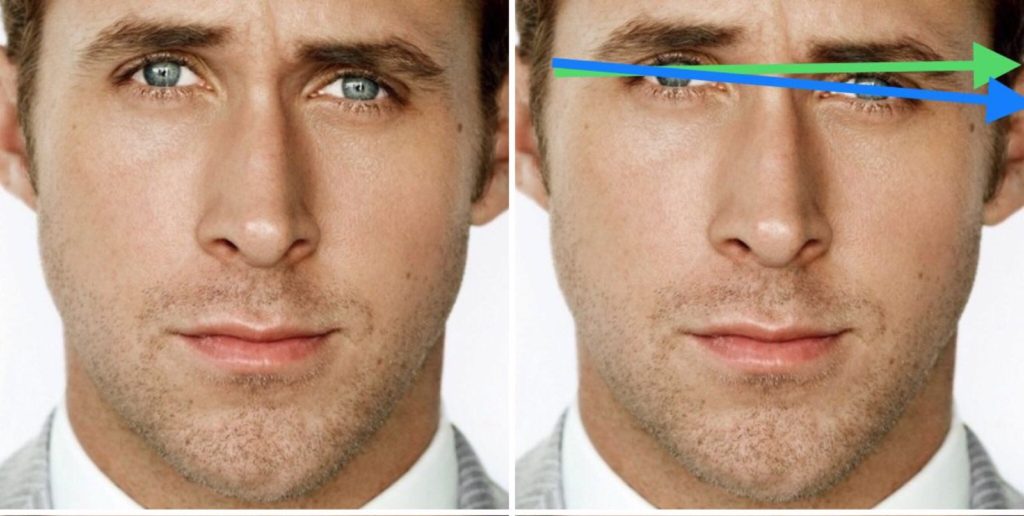
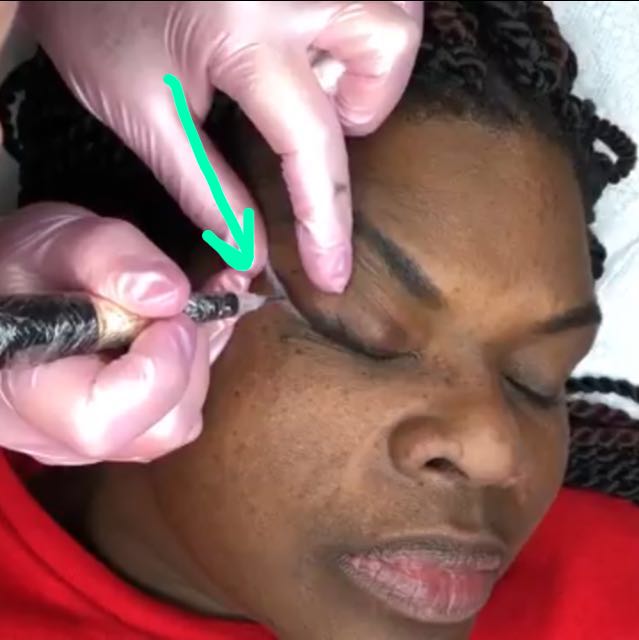
First, we connect eye purples by one line
Then put the perpendicular line in the middle
This is our main axis, this her axis of natural beauty, not 90 degrees with horizon line but with eye purples line ☝🏻
This lines you keep in your mind
And then all you need just choose the angle for your future eyeliners, and compare the left and right angle against the main axis, it can look like that.
The most important that these angles are symmetrical
Just a couple examples.
Symmetrical?
Looks so
Let’s looks closer
For her natural beauty yes, the angle is very close to symmetry that’s why this eyeliner looks so harmonic
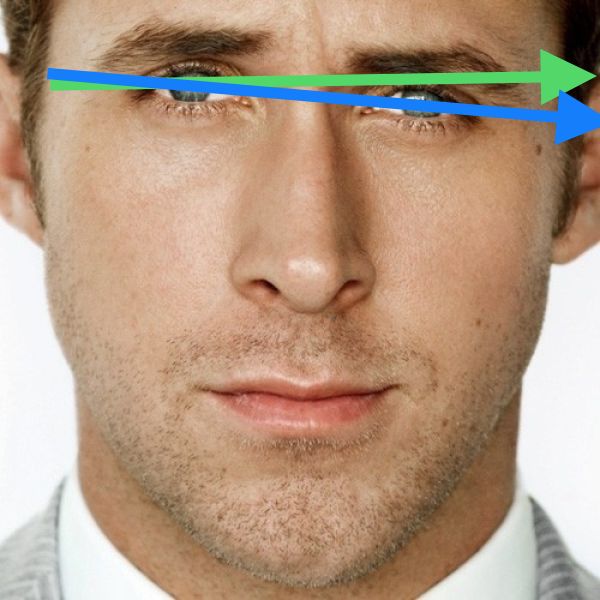
But her eyes compare horizon on the little different level so compare horizon her eyeliners is a little bit asymmetric

This one a little bit higher
So the most important to choose what is your main axis, your own (eye purples line) or horizon and it’s impossible to follow both, for the most symmetrical face these lines are very close to each other
Not symmetrical
And for the not symmetrical face it’s 2 absolutely different lines
And compare the natural axis (eyes axis, blue arrow ) design will look like that

And if it compares horizon eyeliners can look like that
Green line
Compare two these ways your clients can see the difference in this case
With natural one eye looks higher then another one and they can see it, we can compensate it if we will choose another option as you see on the right pic eyes are on the same level .... but
Eyeliners compare each other (left and right) will absolutely different and with eyes, axis left and right tail will be more similar
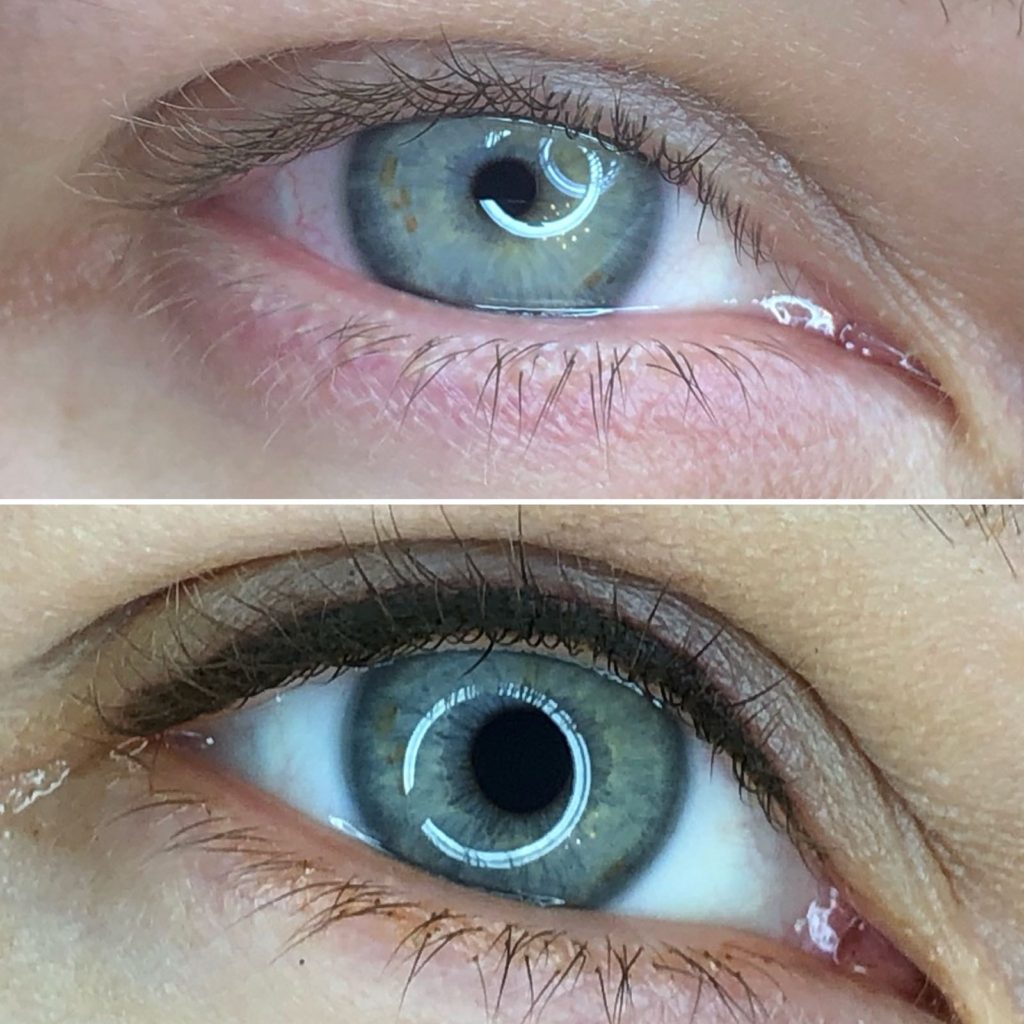
The healed result after 1 procedure
And one more time about step by step technique for the most effective work with classic eyeliners technique.
1. Draw the shape
2. Fix tail without numbing
3. Put numbing
- Work with super dense technique:
- 3RL with carbon pigment (tattoo or organic pmu),
- 45-degree angle,
- move very slow (5-7 minutes for each eyelid)
- slow speed
- maximum stretch
5. Polish your work by single-needle (add extra numbing if needed)
Tail and soft powder upper line made by a single needle in the end
About stretching: the idea is to use two fingers by your left hand
- one finger stretch the skin with a horizontal direction
- and one finger pull eyelid up for more stretching
First, put your finger on the outer corner and stretch it as strong as you can
Then use another finger to pull it up
And also use your baby finger of the right hand (hand with the machine ) for extra stretching

Pull it with opposite direction
So this is 3 fingers 💪🏻💪🏻💪🏻 power, check again my videos and you will see how I put my fingers for stretching 👍🏻
And one more video for you
Touch up 👍🏻
Immediately after touch up

💐💐💐💐💐💐 and we are finished our course 👩🏻🎓👩🏻🎓👩🏻🎓
PLEASE CHECK YOU FIRST AND LAST NAME IN YOUR "PROFILE" IF YOU WANT CERTIFICATE DISPLAYED CORRECTLY
Now you can press Complete and Finish Course xx
The certificate will be in your Profile