
Lesson 4 – Basic technique to create shadow effect, Shape, Practice Lessons
The next technique
Light spraying is the basic technique for creating a shadow effect.
- Performed with only 1 RL needle only!
- Requires good skills for even application into the skin, since 1 RL needle does not meet any skin resistance and deeps into the skin like into the butter. The most complicated moment is to work the same depth and work as superficially as possible without the deep penetration of the pigment and without traumatizing the skin, which very often happens. The skin in this area is very thin and has many blood vessels.
Working with 1 RL we can use an angle of 45-60 degrees for more pigment implantation.
Also, the use of different needles gives a different effect, for example, the use of an acupuncture needle is softer and reasonable for working on a very thin skin since it has a bullet-like sharpening ( picture) and a less traumatic tip.
However, for normal and thick skin is often more reasonable to use a classic needle sharpening as the sharper tip easier to cling to the skin and implants the pigment faster.
Also, it does not require a large number of passes to achieve a result.
Now let’s talk more about the technique, watch the video
Then we see that the technique is:
- A quick long stroke
- The hand should have the support and be placed on the face.
- Needle placed at 90 degrees however the angle can be changed.
- Movement of the ”pendulum” in one direction towards you (you can do two sides movement but not every skin allows to do so) I recommend a movement towards yourself, it takes longer, but there is no risk of implanting the pigment too deep.
- Position of the hand with pen
- The direction of movement of the tool towards yourself, the direction of motion parallel to the forearm.
- The position of the device in the hand and the fixation of the brush on the skin is very important so that the handle sits comfortably in the hand and the hand is well fixed on the skin and does not tear. It allows you to adjust the depth of the pigment implantation.
- The most movement is made basically by fingers and a little by the hand ( video). It is imitates the rowing movement.
You can also compare this movement to the drawing of circles in the air and the needle touches the skin only on the tangent and the input and output of the needle is carried out as a landing and a take-off.
- Equally important is applying the strokes evenly, the distance between them and the distance between the rows.
Your Homework:
Basic movements of SOFT POWDER Technique
Then we see that the technique is
- FAST/ LONG movements
- The hand should have the support and be placed on the face.
- Needle placed at 90 degrees however the angle can be changed.
- Movement of the ”pendulum” in one direction towards you (you can do two sides movement but not every skin allows to do so) I recommend a movement towards yourself, it takes longer but there is no risk of implanting the pigment too deep.
- Position of the hand with pen
- The direction of movement of the tool towards yourself, the direction of motion parallel to the forearm.
This is an explanation of the BASIC movements 👆🏻👆🏻👆🏻
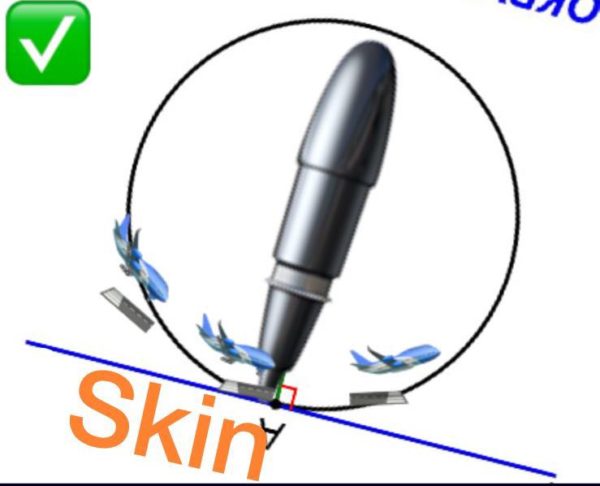
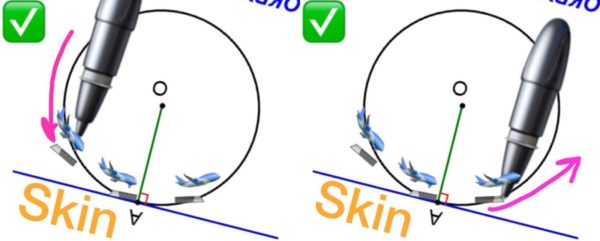
- Skin is tangent
- Machine is radius
- Our movements are CIRCLE
And now about technique explanation and common mistakes 😖
But it’s not everything ☺😉 continue
- The position of the device in the hand and the fixation of the brush on the skin is very important so that the handle sits comfortably in the hand and the hand is well fixed on the skin and does not tear. It allows you to adjust the depth of the pigment implantation.
- Most of the movement is made basically by fingers and a little by the hand. It imitates rowing movement. You can also compare this movement to the drawing of circles in the air and the needle touches the skin only on the tangent and the input and output of the needle is carried out as a landing and a take-off.
- Equally important is applying the strokes evenly, the distance between them and the distance between the rows.
Try to do these exercises, and when you’ll be ready, do the same with a machine on a latex.
Ombré
Drawing the sketch
Basics of sketch drawing plus rendering it depending on different types of eyes.
In this course, we will only discuss the basic aspects that are important for drawing a sketch for eye PMU.
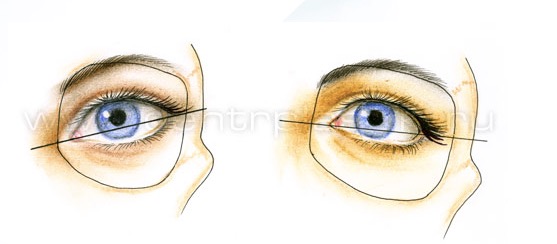
The most important line in eye makeup is the baseline, the edge of the sketch.
In order to properly create this line, it is necessary to remember the basic rules for constructing eyeliners
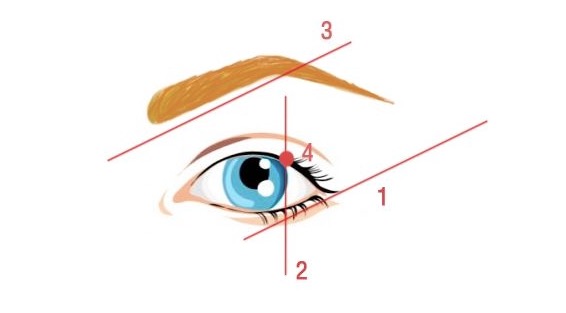
If you look at the axis, then the main point is line number 1, it is the continuation of the lower eyelid line and as a rule, it is the baseline of the eyeliner.
If you look at this line, then to construct it other lines can help as well. I will remind you that all lines of the face are practically parallel and their directions can be easily traced.
- Edge of the lower jaw
- The angle of the lower lip
- Cheekbone
- Lower eyelid at the outer edge
- The bottom line of an eyebrow from head to arch.
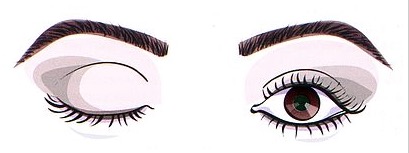
After we determined the direction of the baseline, then we can only play a little with its location to the outer corner of the eye. Play with the distance we can stretch our sketch. We have a small number of options for building a logical and correct sketch.
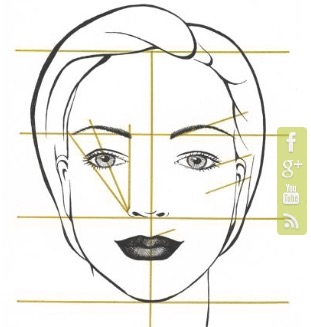
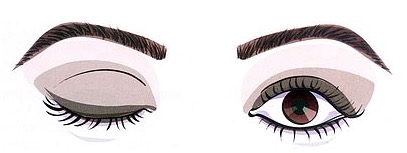
In this picture, the options are shown where the baseline line coincides with the yellow red and blue color of the marginal area that limits the zone of the necessary shading and gives direction and the length of the outer edge.
As you can see, all these options are almost parallel.
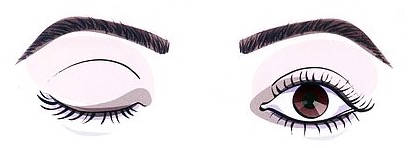
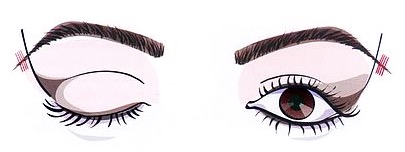
And it seems possible to continue indefinitely, but we are limited by the axis of the eye, the line drawn from the inner corner of the eye to the outer corner It is the second most important line in the drawing of the eye makeup sketch of the eyeliner or eyeshadows.
So, there are three options:
- Ascending axis
- Horizontal axis
- Omitted axis
Since the eyeliner creates new contours of the eye, it changes the axis. The ascending axes create the lifting effect and make the face look younger. The downward axes make the face heavier and with such a make-up the woman looks older and dull.
Paying attention to the horizontal axis of the face passing through the inner corners of the eyes, we draw the arrow the way the client wants as long as the sketch is located in the zone of the ascending or horizontal axis as shown in the picture.
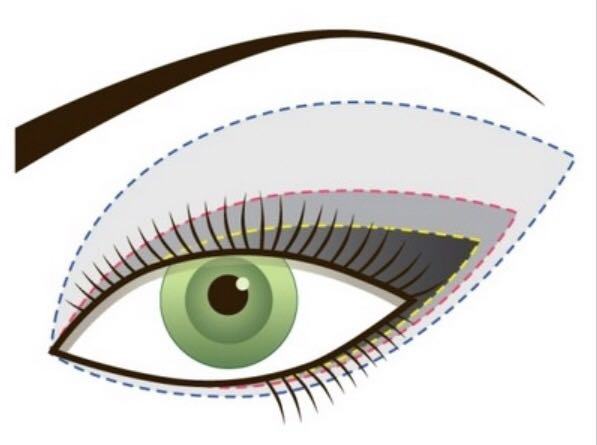
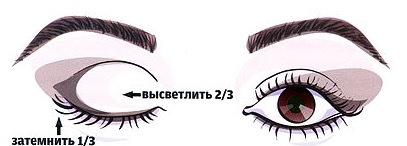
So let’s analyze the most popular cases of correcting the shapes of the eyes with Eyeshadows.
The classical set of the eyes and the horizontal axis of the eye, the application of eyeshadows is possible within the shown boundaries.
Clients with Widespread eyes are not the best candidates for applying the classical version of eyeshadows style in PMU. such a make-up with darkening of the outer corner will visually widen up the eyes even more, in this case, it is better not to use this technique, and it is better to use another style to accent the inner corner of the eye.
Clients with close-fitting eyes are ideal candidates for this technique, make an accent on the outer corner of the eyes. You should be not afraid to make the brightest accent on the Corners.
The overhanging upper eyelid can be visually corrected only by creating a very bright and high-lifted makeup. To see the visible effect, it is necessary to raise the make-up much higher beyond the mobile age so that, with the eyes open we have a lifting effect. This work is very complicated, the volume of work is usually two to three times higher.
I also want to note that such clients can have a very efficient result if have blepharoplasty done. It is worth learning about the intention of the client in this case. It is probably better to consult a plastic surgeon first because PMU does not solve the problem efficiently.
It is always better to first have a plastic operation done and then decorate the eyelid with permanent make-up.
The omitted external corners of the eyes can be very well correlated with eyeshadows and perhaps this is the only truly effective way to make the face look more positive and open.
This option has only one disadvantage -the correction is visually visible only when you create a bright decorative makeup effect and draw clear lines and at the same time. Not every girl agrees to wear such an evening looking makeup in daily life. All these nuances must be discussed in advance and if the client does not like such an option it is better not to perform any PMU at all because any additional eyeshadow will only emphasize the already omitted corner of the eye.
I remind you that to draw a sketch you need to pay attention to the individual characteristics of the client’s style, lifestyle, physiological and anatomical features, features of a face, coloristic type and natural contrast of a person’s appearance.
Now I’m offering you to watch a video about drawings a sketch for the permanent makeup and how it looks in real practice.
And I fix the shape without numbing it’s painful a little but it’s quick so the next stage is fixing the sketch.