
Lesson 3 – Contraindications of PMU and Work Place
And let’s talk about the contraindications of PMU:
There is a lot of contraindications and they, probably, are fully not recorded anywhere.
I will try to formulate: any virus and bacterial in an active stage, illness of immune system, autoimmune diseases, state immunodeficiencies, including HIV, a psoriasis, a neurodermite, allergic diseases, cancer diseases, dermal diseases, atypical changes of integuments, including benign and malignant tumors, pigmentation disturbances, including erratic ones, a herp in exacerbation stages, an infectious, virus allergic conjunctivitis, a diabetes mellitus, a serious illness of internals a renal, liver failure, predilection of a skin to formation of keloids, hemophilia and disturbances of coagulability of a blood, alcoholic drug intoxication, an epilepsy, alienations, hormonal diseases, pregnancy and feeding of a breast, the menses period, also the therapy period of the antibiotics, hormonal drugs, drugs influencing change of coagulability of a blood and many others.
If the person is sick and undergoes therapy better to cancel the procedure. In any doubtful situations the procedure can be made only with the written permission of the doctor.
In order to defend yourself as master, the client should sign "the written informed consent of the client", where we warn him or her about a process of the procedure, medical contraindications, possible side effects, and the required post-procedural care.
____
And one more interesting question. We are always asked by students: I was taught that permanent makeup lasts 5-7 years. But from your course, I read out that it's 1-2 years.
Let's look where we put the pigment. You already know that we have some control level for our work. It is a basal membrane that separates epidermis and dermis. We should work in the epidermis, touch basal membrane and put the pigment a little bit lower into dermis but not too deep. You probably know how thin epidermal level of skin is and it is not so equal in real life as we see on usual schemes. So technically we can't always stay in epidermis we will go in the dermis but our task lay pigment as high as possible.
Where to put the pigment it to stay in the skin very long (say 5-7 years)? If we place pigment deep in dermis it lasts much longer and you will see brighter remain after healing. But the deeper you put the pigment the bluer color you have after healing. Even warm brown pigment placed deep in dermis looks like cold metallic ash.
How to put pigment it to stay in the skin longer? You should put it very densely. So you will see no air in brows to put enough for several years. Both factors deeply and densely will give you perfect blue and not transparent brows as everybody did 10 years ago. We still have this client coming to us for laser treatment. They come 5-7 times to leed out all this deep and dense pigment.
More reasons not to do deeper and denser? The dermis is in a very big and complex layer of skin and capsules of pigment can migrate in it in time. And unfortunately, they migrate deeper and deeper.
So when you see blue brows the reason can be not wrong pigment but the wrong level and migration of pigment to depth.
Why do we talk about 1-1.5 years before the refresh procedure? Now the answer: Because we work not deep and not densely. Our powder brows should be made superficially not to have blue nuances and transparently in most part of brows not to be too heavy. Such PMU looks more pale and transparent already in 1-1.5 years. Very thick and oily skins can get reed of pigment at all during this period. But for everyone who wants us to make PMU very natural such PMU will look properly and live without plumbeous brows in 1 year. And it's important.
Now the question do you still want to make brows for 5-7 years?

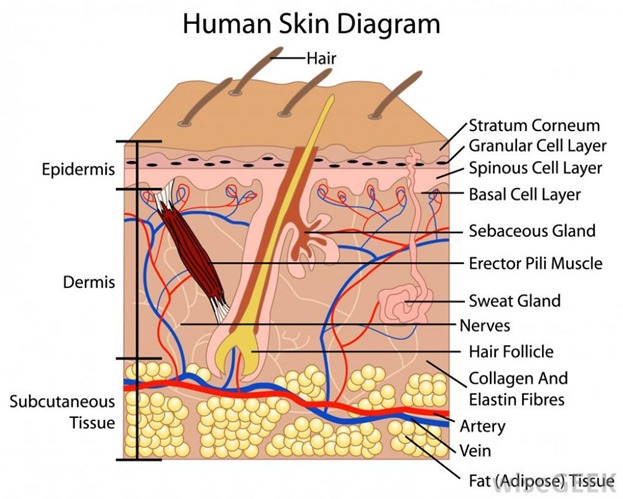
Just to remind you about skin layers!
I would like to talk about the workplace because we did not mention everything that we need to use for PMU. So let’s look at the place of the master as it is in our studio.
1) Documentation (the questionnaire, the agreement, the informed client's consent)
2) Camera
3) Scissors
4) Tweezers
5) Pencils for eyebrows, lips, eyes, shadows, brushes, white pencil, black and red gel pens
6) A remover for cosmetics
7) Device (machine)
8) Modules, needles
9) Pigments
10) Food wrap
11) Vaseline oil
12) Cups for pigment
13) Anesthesia (F&E-tattooist, TKTH, Doctor numb, Goochie, Eye anesthetic)
14) Protection for eyes (Corneregel, Celluvisc drops, solution for lenses - we wash out eyes)
15) Сhlorhexidine hydrochloride water solution + antiseptic soap (Detol, green surgical soap, etc.)
16) Fenistil (removes reddening and hypostasis)
17) Hydrocortisone for eyes after PM
18) The distilled water
19) Gloves
20) The wadded disks which aren't stitched
21) Toothpicks
22) Q-tips
23) Disposable trays or metal ones, it is possible rubberized napkins (to put the machine and wet disks)
24) Disposable sheets
25) A disposable hat for the client
26) Boot covers
27) Medical robe
28) Second footwear
29) Couch
30) Little table whatnot
31) Medical cupboard (for needles and some other expendable materials)
32) The lamp is medical shadowless
33) A chair (medical, office with adjustment)
34) Reservoir under small garbage
35) Garbage can
36) First-aid kit
37) Anti-AIDS kit
38) Anti-shock kit
Maybe I translated something not quite correctly because some words are not used by me in usual conversations but I hope you understand what I meant in every concrete case. If you have any questions you can ask and we can discuss these questions.
As for last lines in our list
36) First-aid kit
37) Anti-AIDS kit
38) Anti-shock kit
Of course, every country has its own medical standards for these kits. And they can be absolutely different for different countries. Moreover, I admit that some medicine we should use in our kids can be strictly prescribed or even forbidden in some countries. Anyway I will show you the variants of such kits for Russia:
First-aid kit:
1. Bandage medical or dressing package
2. Medical cotton wool
3. Adhesive plaster
4. Brilliant green (antiseptic)
5. Iodine solution (antiseptic)
6. Manganese solution (antiseptic)
7. Medical spirits
8. Medical rubber tourniquet
9. Analgesic, spasmolytic
10. Andipal (for pressure decrease)
11. Antihistaminic medicine (suprastin, tavegill)
12. Adsorbent (absorbent carbon, enterosgel, etc.)
13. Means against food infections
14. Antiseptic ointment
15. Valocordin (sedative spasmolytic medicine)
16. Nitroglycerine
17. Baking soda
18. Liquid for rinsing of a throat and a mouth
19. Tooth drops
20. Disposable sterile syringes
21. Vaseline
22. Citramonum (the anesthetic increasing pressure)
23. Capoten (for pressure decrease)
24. Corvalol (sedative)
25. Valerian tincture (sedative)
Anti-AIDS kit:
1. Alcohol of ethyl 70%
2. Iodine solution of 5%
3. The solution of boric acid of 1%
4. The solution of a protargol of 1%
5. Manganese solution of 0.05%
6. The distilled water ы the volume of 100 ml.
7. Glass pipettes
8. Sterile cotton wool
9. Sterile bandage
10. Wadded and gauze bandages
11. The antiseptic adhesive plaster
12. Scissors
13. Fingerstalls
14. Toilet soap
15. The solution of chloramine B 3%
16. Surgical gloves
Anti-shock kit:
1. Disposable sterile syringes 20ml
2. Disposable sterile syringes 10ml
3. Disposable sterile syringes 5ml
4. Disposable sterile syringes 2ml
5. Disposable sterile syringes 1ml
6. System for intravenous infusion
7. Medical rubber tourniquet
8. Medical unsterile mask
9. Surgical sterile latex gloves
10. The disposable air duct
11. Adrenaline of 0,1% 1ml #5
12. Prednisolone 30mg 1.0ml #3
13. Eufillin of 2.4% 5-10ml #10
14. The solution of Dimedrol of 1% 1.0ml #10
15. Sodium chloride of 0.9% 400ml #1
16. Glucose of 5% 400ml
17. Suprastin 20mg 1ml #5
18. Ammonia 40ml
19. Mezaton solution of 1% 1.0ml #10
20. No-shpa 1% 1.0ml #5
21. Caffeine benzoate of sodium 200mg 1.0 #10
22. Antiseptic spirit disposable napkin
23. Sterile cotton wool
To tell the truth, all these kits have very formal presents in our salons because many things, mentioned in these lists, have a lot of modern analogs. I guess these lists were approved a long time ago and according to some standards which can be used by our free medicine.
In addition, you should be a doctor in order to use the Antishock kit. And of you punctured the finger with clients needle there is no guaranty that you will not be infected even after processing your finger with all mentioned antiseptics.
But anyway if you have some of these kits you can do what you can in emergency situation. I wish no one from you never had them at all.
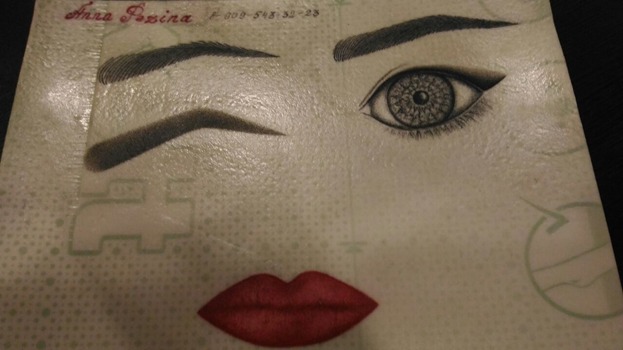
Dear colleagues, I advise training your skills on artificial skin if even you are working master. To train your hand better and better. We use linoleum and work on the backside of it.
It is strange but exactly this surface reminds real feeling of work on skin. But I should say beforehand that linoleum will take a lot of pigment and show all your passes. Real skin doesn't do the same. So if to compare the work on rubber rugs and linoleum. Rubber rugs will be sort of difficult from the laying pigment point of view like real thick skin but the feeling of work on it is not the same as work on real skin.
The linoleum reminds the work on dry skin (the same bright effect), in addition, alike feeling from touching the surface of linoleum with needle-like real skin.
Why is it important to do these exercises? Because you can train your skills to lay even strokes (i mean shading). And you can see the true work of different types of needles. Usually, we use 1rl, 3rl, 3rs, 5rl, 5rs, 7rl, 7rs, 9rl, 9rs needles.
How long should a procedure takes:
It is a very popular question in our courses. Actually it depends on the quality of the skin and the chosen technique. I have 2.5-3 hours time slot for any procedure. It means 2.5-3 hours between clients. So during this time I talk to the person, make a photo, make a sketch, put anesthetic, prepare the workplace, mix pigment, make the procedure, talk to a client, tell about aftercare, calm down a little bit, choose time for touch up. So I guess work takes 1.5-2 hours. But I am a perfectionist, I know that some masters can do procedures faster. Anyway, it is a very important topic of how to stay in schedule and what schedule looks like.
I teach my students to look after time. Define your own time slot according to your usual time of work. Always notice when you start and finish every step of the procedure.
• First talk to a person,
• Taking of photos,
• Making of the sketch,
• Putting anesthetic,
• Preparing the workplace,
• Mixing of pigments,
• Making procedure,
• Talking and calming client down about swelling after procedure and results after healing,
• Talking about aftercare,
• Choosing the time for a touch-up
Make your own statistics and correct your time slot for one procedure if you see that you are always not in the schedule.
When you are not satisfied with your personal time of work please look at what step takes too much time in your opinion and try to optimize it.
If you see that exactly tattooing takes too much time trying to observe it where you lose too much time and why. For example, making the first pass and fixing shape, making tails denser, making gradients, making beginnings equal and so on.
Usually, the problem is in fast work in the basic pass and in the darkest areas. Remember where you should make the intensive color you should be very systematic slow and careful. No hurry, no jumping, no dusting there, there is one rule for dene areas “the slower the faster”.
Just be careful about light and transparent areas. There are opposite lows there: lighter, faster, jumping, dusting, “better more light layers than more regrets”.
Time management will help you to make work easier and calmer, in addition, you can increase your personal income, just recording the time of your work and optimizing the main steps.
We can consider some schemes to work with brows.
1- 1st pass fast usual horizontal strokes near edges of the brow
2- 1st pass slow short strokes inside the brow
3- 1st pass filling of beginnings with fast long strokes out of brow
4- 2nd pass - additional level to do dense color inside
5- 3d pass to do smoother gradient between beginning and body of the brow
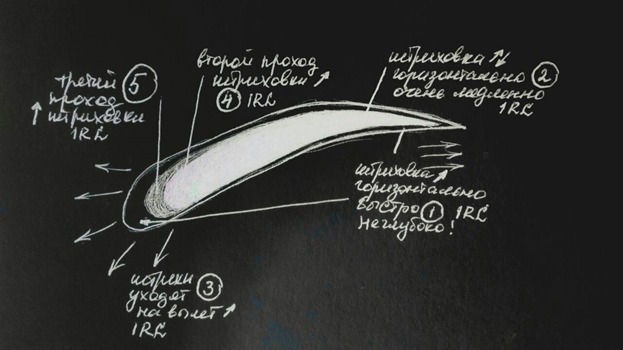
Actually it is conditionally. You can do more passes. The main thing is to put a more transparent and denser color as you see in the picture.
The picture contains Russian words. English ones are above. Actually I wanted to show just a picture where you should put dense and transparent color.
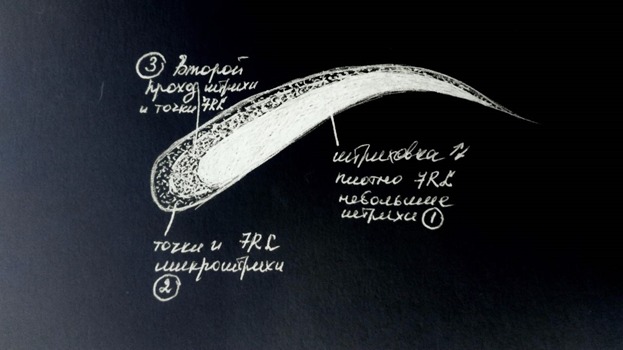
1- 1st pass, dense little strokes, 7rl
2- 2nd pass, separated micro-strokes, and pixels, transparently, 7rl
3- 3d pass, micro-strokes and pixels, medium density, 7rl
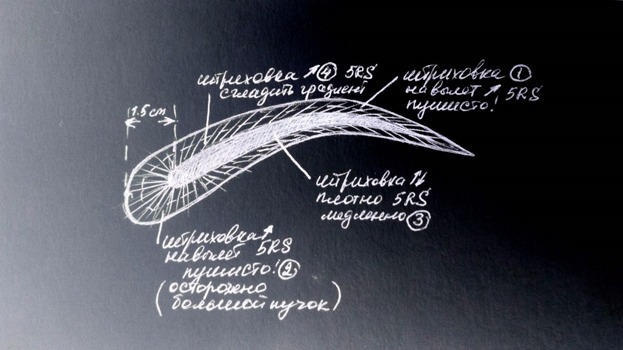
1- medium strokes out of brow, fluffy, 5RS
2- long strokes out of brow, carefully because of a many-pins needle, fluffy, 5RS
3- short slow strokes, densely, 5RS
4- medium strokes for smoothing gradient, 5RS
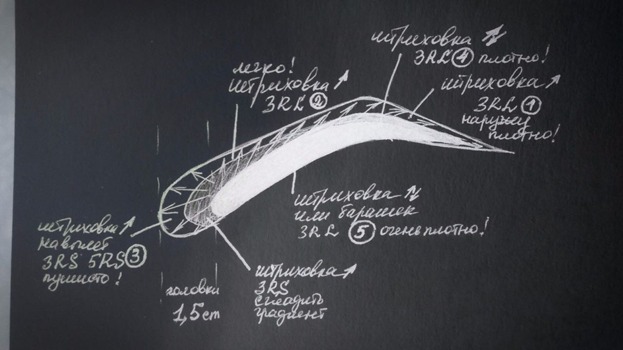
1- short strokes out of brow, densely, 3rl
2- medium strokes out of brow, lightly, fluffy, 3RL
3- long strokes out of brow, carefully because of a many-pins needle, fluffy, 3RS or 5RS
4- short slow strokes, densely, 3RL
5- short slow strokes or slow circular movements, very very densely, 3RL
These are just examples of how you can work. Of course, what you have to use depends on skin and task for the procedure. But you can see one main trait of all schemes: you should make fluffy beginnings and upper side of front parts of brows, more dense tails, very dense bottom lines and smooth gradients between dense and transparent sides. Actually this is the only secret of ombre or powder brows. I hope you will understand this only principle and can apply it for your works.