
Lesson 1 – Video of procedure with Descriptions #1
This section contain Eyebrows Techniques. Videos of full procedures, Machines I'm using for Eyebrows, how to collect it videos, Needles descriptions
Here is the first video for you about those brows
Mostly speed of movements is important in the method showed you on this video. You can pass all brow with horizontal movements but you should do fast and long movements where the color should be lighter and more transparent, and you should do short and slow movements where color should be denser.
When you can do this try to play with the direction of movements. Of course, it is more preferable if you repeat the direction of real hair growth in brows. You'll get more natural effect in PMU.
Here is a picture of the area that should be dense and the area that should be lighter. Word on the photo on Russian, and I add description after:
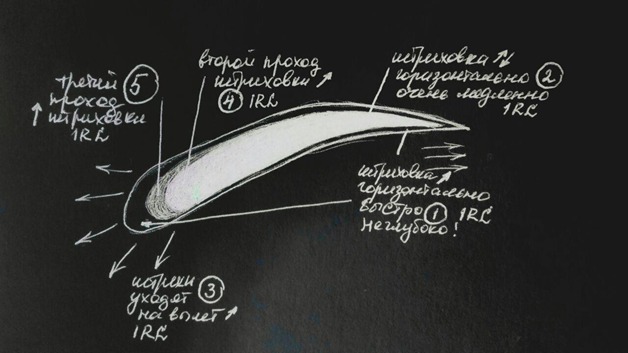
- 1 - 1st pass fast usual horizontal strokes near edges of the brow
- 2 - 1st pass slow short strokes inside the brow
- 3 - 1st pass filling of beginnings with fast long strokes out of brow
- 4 - 2nd pass - additional level to do dense color inside
- 5 - 3d pass to do a smoother gradient between the beginning and body of the brow.
Actually it is conditionally. You can do more passes. The main thing is to put a more transparent and denser color as you see on the picture.
The technique of Ombre brows
For ombré decorative brows, I'm using 3rl needles
Control of effective work
1. If higher the speed then greater device makes the punctures, which means that should be more pigment in the skin, the way it is until the moment when the device begins to do empty punctures on the vibrating skin. That’s why we should feel the skin and maximum speed for it.
2. The different slope of the needle allows you to adjust the color intensity
3. The speed of the hands' movement and the length of stroke: If the movement-wide and fast, then the device makes fewer dots. If the movements are short and slow, then the device does more punctures and denser color.
4. Configuration of the needle: Then the more pin needle, then the pigment lays higher, but with a larger area spot.
5. Pigment concentration: Concentrated pigment faster goes to color
6. Laying of pigment depends on its physical and chemical properties. Different pigments are put differently, the right choice of pigment affects the speed
7. The position of the needle also affects. From the shorter needle the more pigment drops. On a different length of the needle we feel the skin differently
8. Sharpening of needles - sharp or bullet, texture or not. 9.Characteristics of the device, someone harder, someone softer.
10. Wiping, If we clean very often then we have less color
11. The skin stretching, on different skins, it can work or cannot
12. The use of anesthesia has a negative impact And etc
I'm constantly working with:
1. For eyebrows, I use dragonfly in 100% of procedures
2. I like dark concentrated pigment, I put it transparently
3. Speed of my dragonfly always about 6.5 for slow/short and 7.8 for fast/long movements Now parameters which changing in my work:
1. Needle – it can be 1RL or 3RL, or 5RL it depends of a skin
2. The speed and length of stroke: from dots and short strokes to fast stroke about 1cm length if I need powder.
3. The skin stretching. If skin too thin I stretch it less
4. The slope of the needle, if nothing helps, I begin to increase the corner.
5. Everything else on the circumstances, clearing frequency, anesthesia and etc.
About needles, everything is very simple
1. Small needle much effect, so 1 pin needle 80% of color after healing, 3rl can give you 70-60% of color, 5rl 50% ..... Etс but ☝�if the skin is bleeding that means that I'm working to deep so I'm changing the needle for large
2. I'm taking 1 pin if it's not working 3rl, if it's not working 5rl if it's not working I'm taking hands tools( 8rl softap, 2rows 21needles )
3. 1 pin needle only for good skin, 3rl is my favorite type of needle ❤
RL means R - round L - liner, RS - Round Shader
F - Flat
M - Magnum 2 rows of needle
The machine I'm using for eyebrows
Speed depends from the skin, device, technique and needle type, you can change speed for more effective work always
Usually in we use 1rl, 3rl, 3rs, 5rl, 5rs, 7rl, 7rs, 9rl, 9rs needles, different needles allow you to achieve different effects. I can observe all in general. R means round, L means liner, S means shader, F means flat, M means magnum (flat many races needle) and you can find slope needles also (flat with the sloped edge). 1RL is always liner, it leaves the simple single track, so you can achieve a solid line or if you move hand fast you can achieve very light and airy shading. However, it's nice only for dry, transparent and normal skins. Thick skins try to get rid of all pigment you put with 1rl needle. The one-pin needle should be used carefully. Because it can be immersed in the skin very deep. We try to avoid deep PMU.
3RS is shading needle, it is round, needles are separated. The trace from it looks like a trace from a soft brush with 3 hairs :)))
3RL needle is a liner, it is round too but needles tightly coupled almost into one needle. The trace from it looks like a thick line. As 3 needles catch more pigment than 1 needle and as a trace from them not so simple it is very good for thick skins. It refers to other many-pins-needles. We notice that such needles leave more pigment in thick skins after healing. This is why we use 5, 7, 9 and more pins needles. What is good about such needles? You can't put them too deep into the skin because the pressure on one needle in a beam is less than the pressure on one needle when you use 1RL (less proportionally to the number of needles in the needle beam). What is bad about such needles? They leave more solid trace no matter what needle you use S or L because needles are placed at a certain distance from each other a little bit closer or further but anyway you can't add the air into your lines because factually you use a tight brush.
Then the magnum, flat and sloped needles are nice but more complex in work because all of them are flat. Magnums have 2 types of M1 and M2. M1 are flat shaders, the needles are separated there. M2 are flatliners, the needles are linked together. Using flat needles you should carefully look after your hand how you hold the machine and how you move it because when you turn it you change the angle between the plane of needle and direction of moving of your hand. This is why it's better to use and buy only round needles from the beginning.
Totally, the more pins in needle we have the less strokes (from a size point of view) we should do and the slowest movements we can choose.
So when I'm working with 7 or 9 pin needles I making little slow strokes. When I work with a 1rl needle and want to make a very transparent and fluffy effect I work with faster and longer strokes. As for movement direction, better to work and put strokes in one direction because you can control your movements better. The most natural movement is directed to yourself for an average person. So you can make an experiment. Pls, take the pen and feel any form with even strokes directed to yourself and second form with strokes directed in both directions to yourself and from yourself. Then compare the result. You will see that the first form will be filled much better, but the second form will contain some spots.
So as for your question, it's up to you how to move your hand. The main thing you to be able to achieve the best result, the most equal filling of brows with pigment.
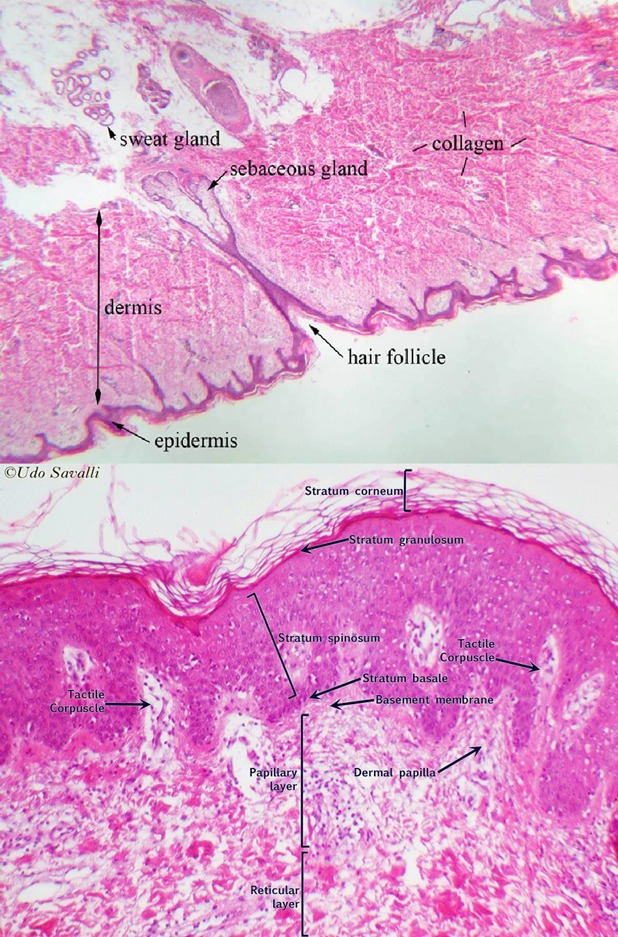
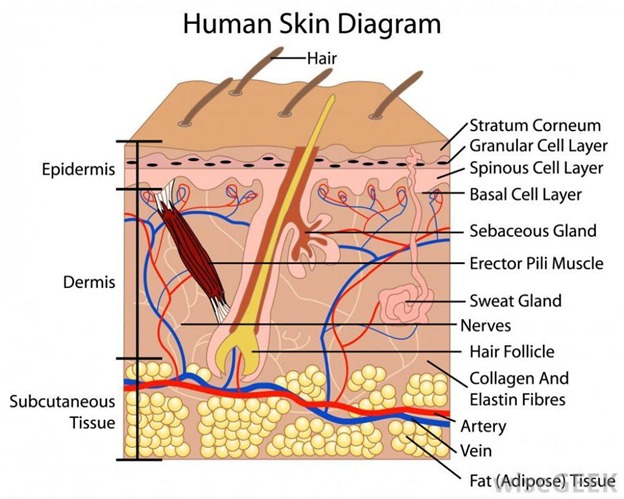
As for the depth where we work. Actually we should put pigment not deeper than 0.3mm into epidermis before basal membrane which separates epidermis and dermis. We should work in epidermis and sometimes touch the basal membrane. But you can see on pictures how thin epidermal level of skin is and it is not so equal in real life as we see on usual schemes. So technically we can't always stay in epidermis we will go in dermis but our task lay pigment as high as possible. The skin should not bleed if you do everything correctly. But if it is bleeding that means that you broke basal membrane and put pigment much lower - into derma where vessels are located.
If we place pigment in dermis it last much longer and you will see brighter remain after healing. But the deeper you put the pigment the bluer color you have after healing. Even warm brown pigment placed deep in dermis looks like cold metallic ash.
Why more we shouldn't go deeper? Because dermis is in a very big and complex layer of skin and capsules of pigment migrate into it in time. And unfortunately they migrate deeper and deeper.
So when you see blue brows the reason can be not wrong pigment but wrong level and migration of pigment to depth.
About solutions:
�For the most tight and oily skins always use hand method and different hand needles for different areas and shapes (flat7, round 8, flat 24, and so on till 114 pins).
�If skin is not so bad but anyway you have doubts about result use many-pins-needles such as 7rs, 9rs (use them slowly).
�For usual skins use mostly 3rl, 3rs,
�For good skins use 1rl for fluffy areas and 3-5-7 for more tight areas and create what you want there. everything will stay in the skin.
�If you have very dry skin dilute the pigment with water twice, take 1 needle and be very careful pigment to lay evenly.
Solutions are not only about needles, you should choose right needle and right pigment. As for pigments:
The more tight and oily skin you have the more strong, grasping and tenacious pigment you need (tattoo pigment, 6th sense, li-pigments), the more dry skin you have the more delicate pigment you need (most types of modern permanent make up pigments such as biotech, biotouch, softap, burebeau, my style, ltl, bmp and so on ).